Air pollution is a popular topic these days. But it should be even more. In many parts of the world, air pollution is above the acceptable levels. And in some it’s a major environmental and health problem, affecting everyone. Until recent years, partially due to the high cost of measuring equipment, there was a lack of accessible data regarding air pollution.
Advancements in technology brought us new generations of low-cost air quality sensors. This opened up many interesting opportunities and a wide range of applications, which helped raise awareness of air quality challenges.
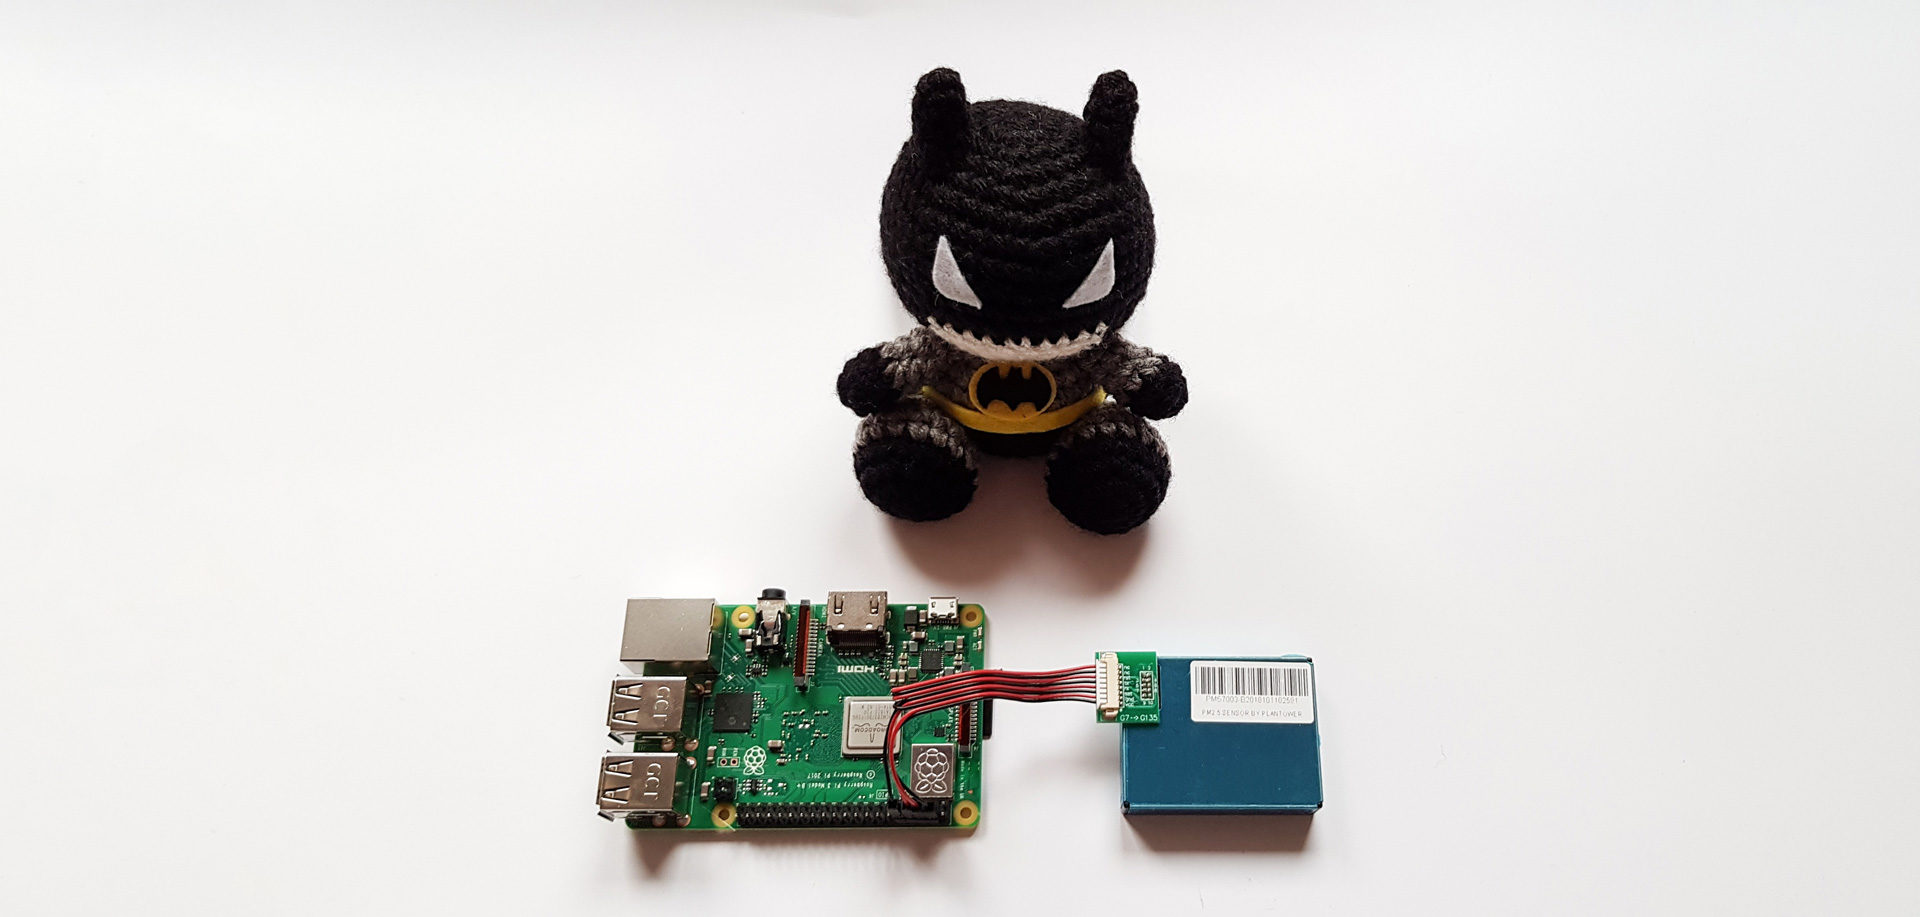
I always wanted to do something useful with a Raspberry Pi. Some time ago I became aware of air pollution in my country, got interested in this topic and decided to make an air quality monitoring device for indoor usage, as a personal project. The idea was to start with a particulate matter sensor and later add temperature, humidity, VOC and other sensors.
If I got you interested and you have a little bit of Java programming knowledge, follow the steps below to build an air quality monitoring device for yourself 😉
Hardware
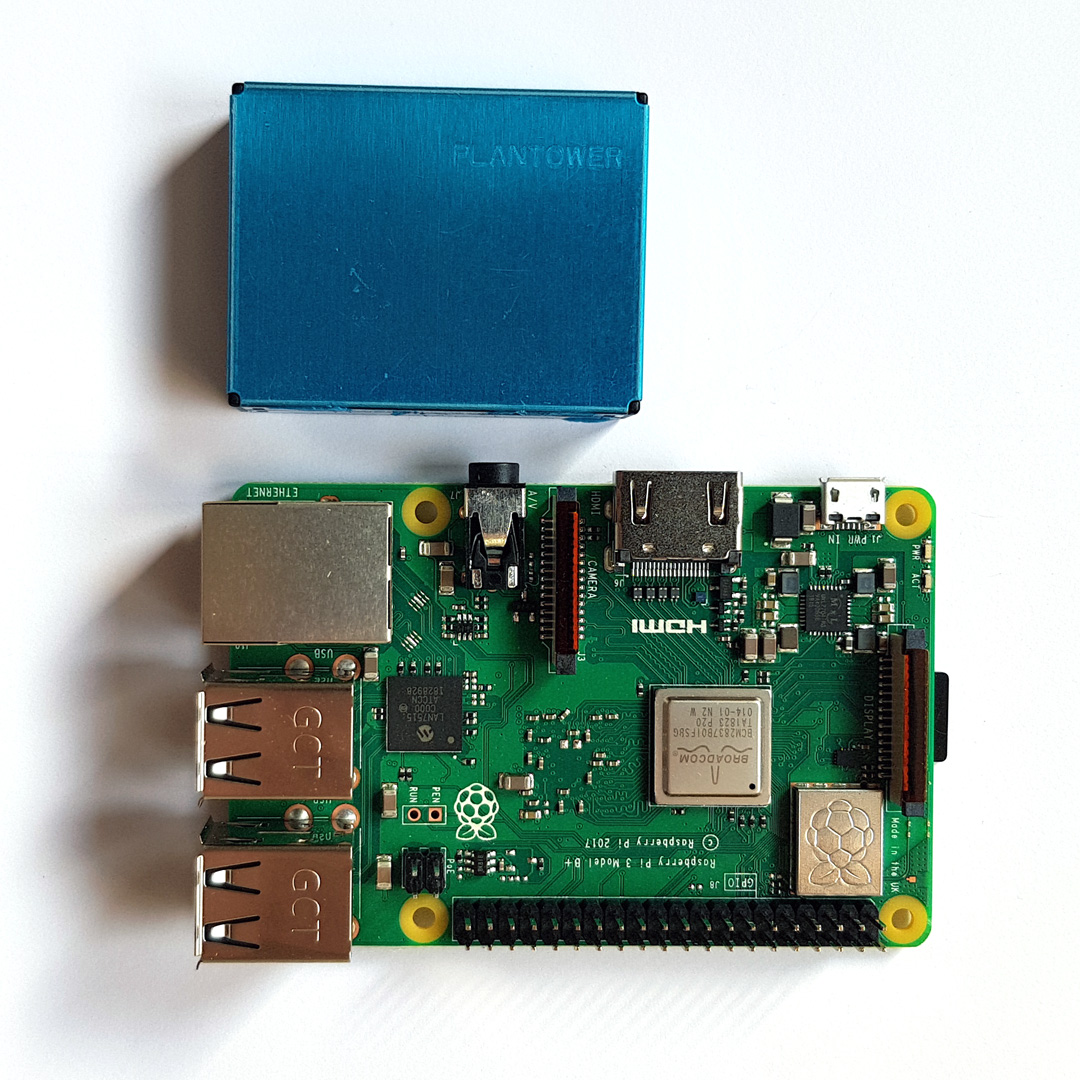
Raspberry Pi
You can use any Raspberry Pi model, but if you are just starting – get the latest Raspberry Pi model, an official power supply and a SanDisk Extreme or Samsung Evo Select MicroSD card.
Particulate matter sensor
Probably the most popular PM sensor used in DIY projects is SD011 by Nova Fitness. But after reading a few research papers I decided to go with a Plantower PMS7003 sensor, because it seems to be more accurate than others.
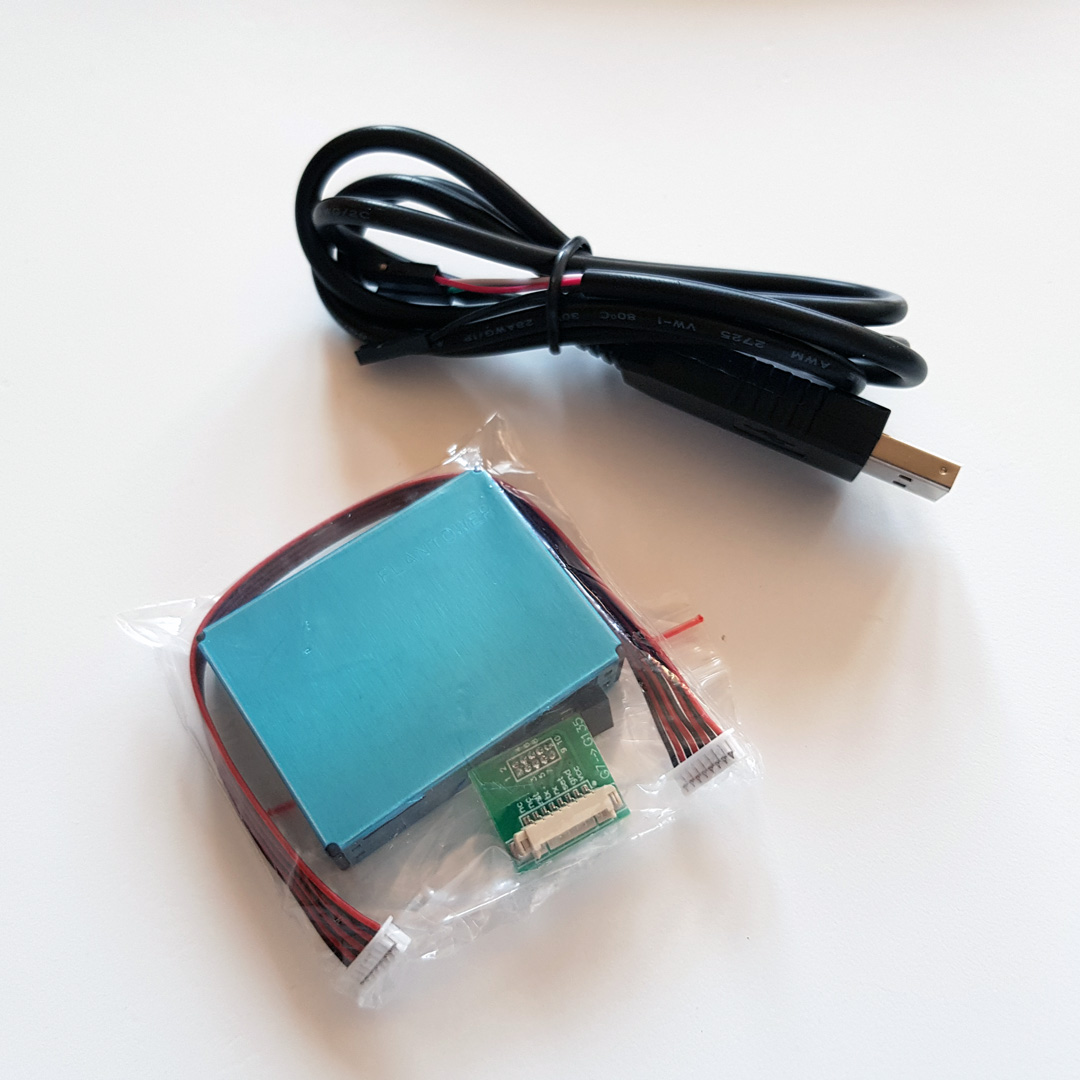
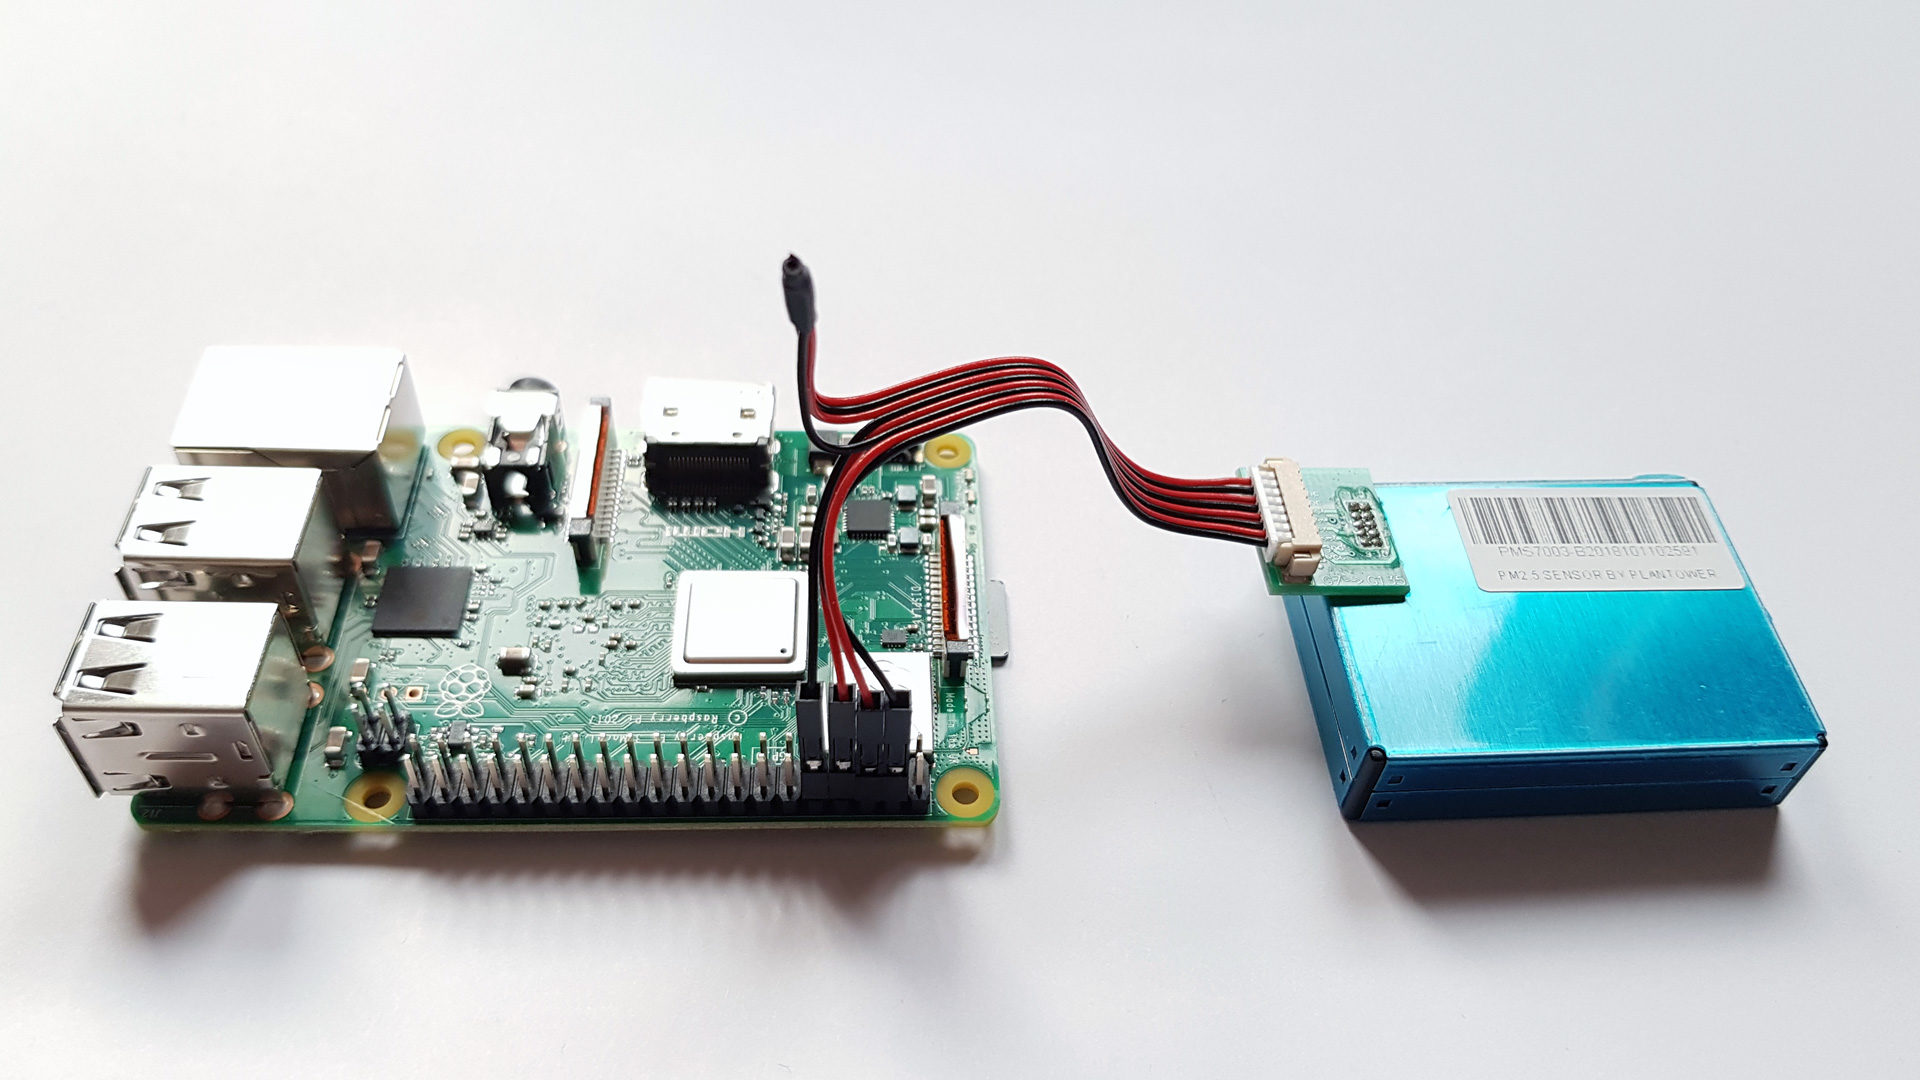
You can get PMS7003 on AliExpress. One important thing here is to also purchase a G7 adapter and a cable for PMS7003 (if it’s not included), so it would be easier to connect it to your RPi. With this adapter and a little bit of tinkering, you can connect the sensor to GPIO pins. In case you’d like to connect it to a USB port, also purchase a USB to UART adapter.
PMS7003 uses serial communication for data exchange.
PMS7003, and most probably all other low-cost PM sensors with the same working principle, is not made to be used outdoors. Although used in many DIY projects for outdoor air quality monitoring, researches show that high humidity badly affects the PM measurements.
These sensors are not as accurate as more expensive professional devices but are good enough to give an idea of the pollution in the air.
From my experience so far, PMS7003 measurements are comparable to official government air quality measurements available for my neighborhood.
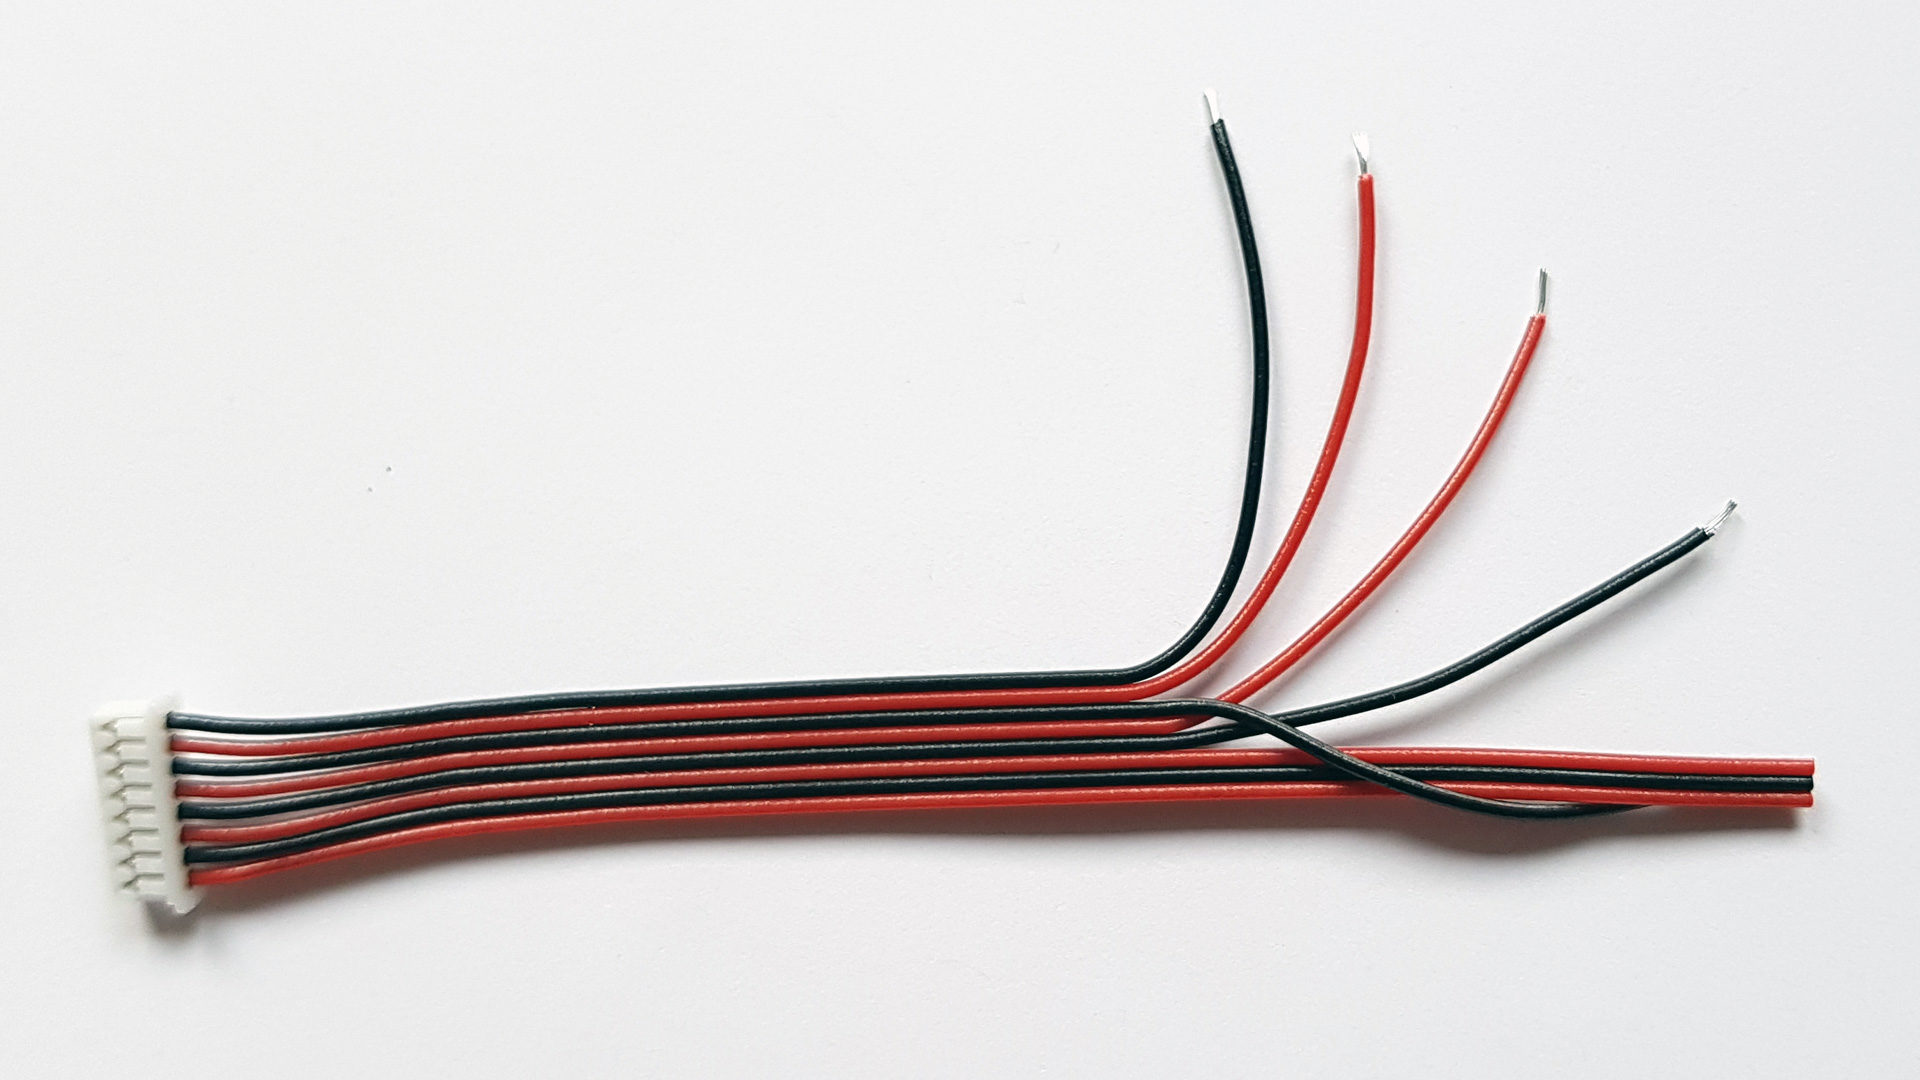
Wires, tools and other stuff
I decided to connect the sensor to GPIO pins, to make everything as compact as possible. If you go that route, in addition to the mentioned G7 adapter and a cable, you’ll also need:
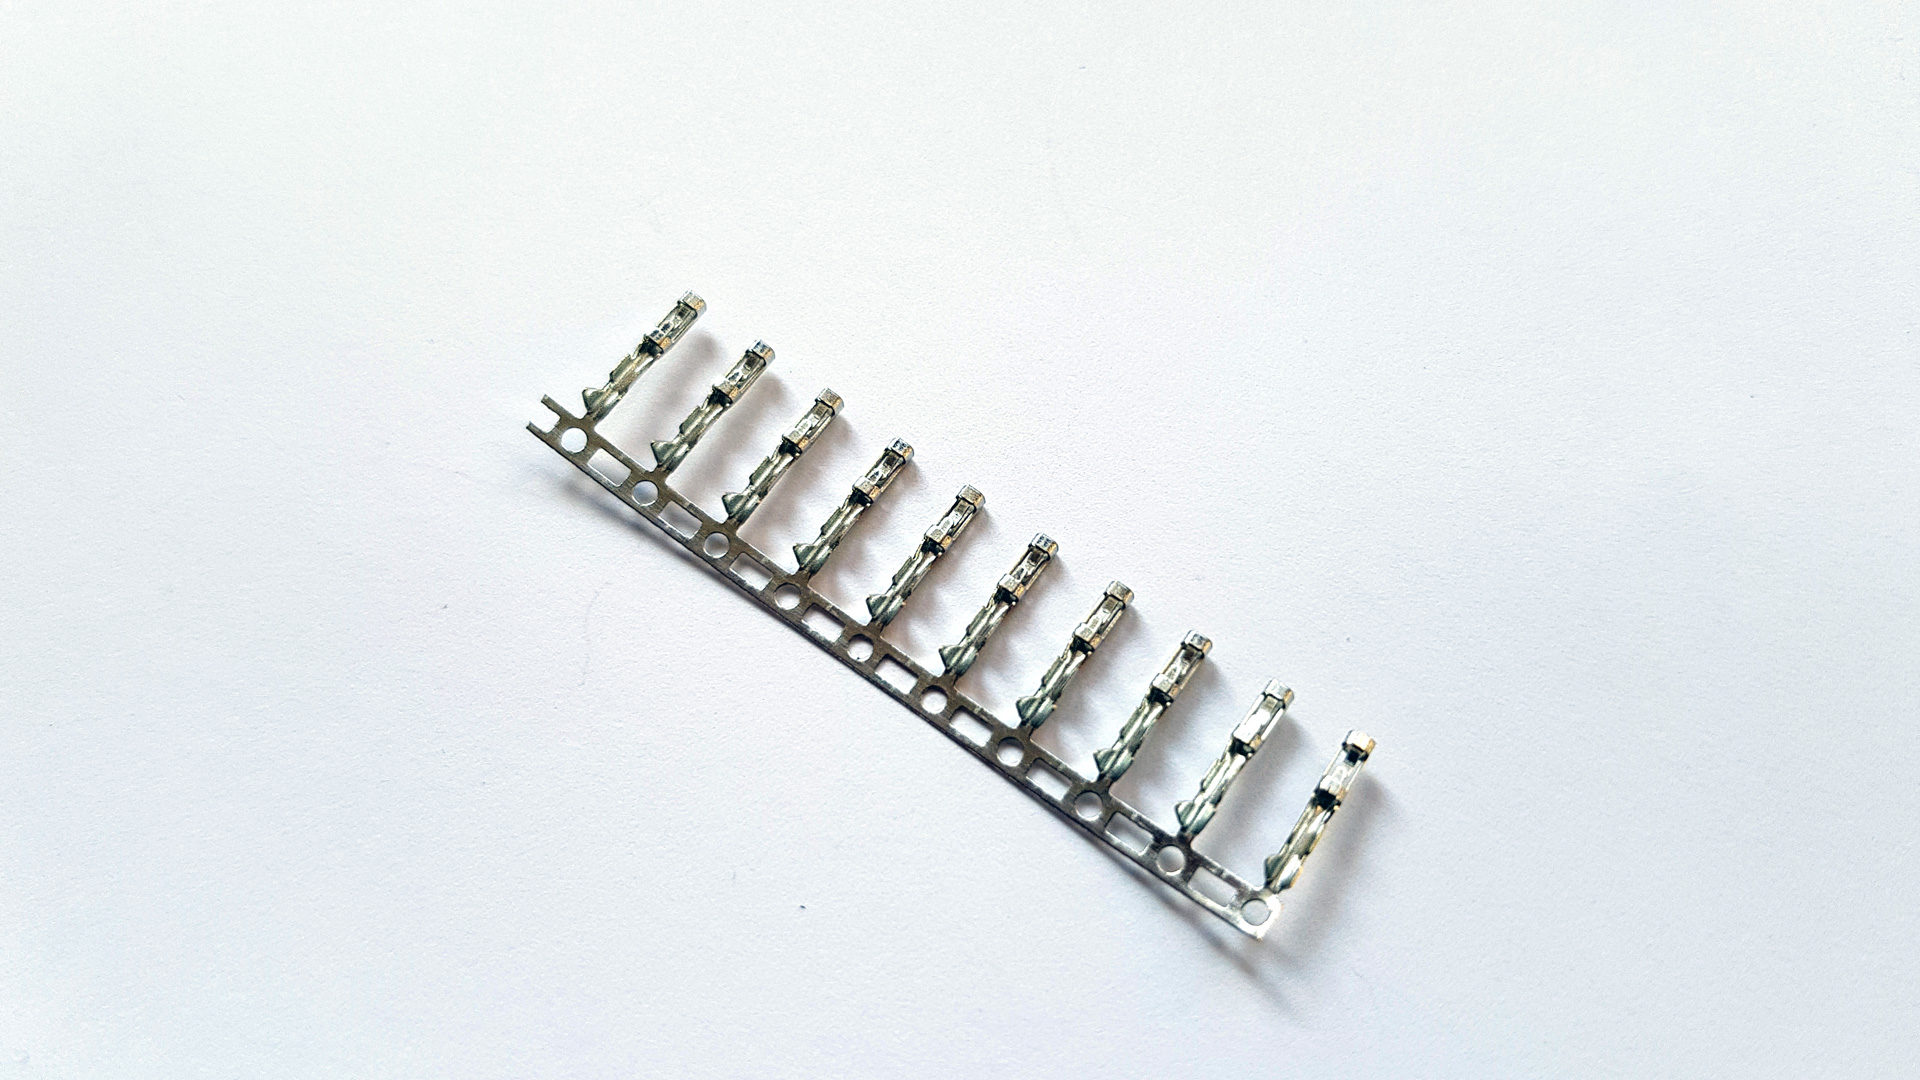
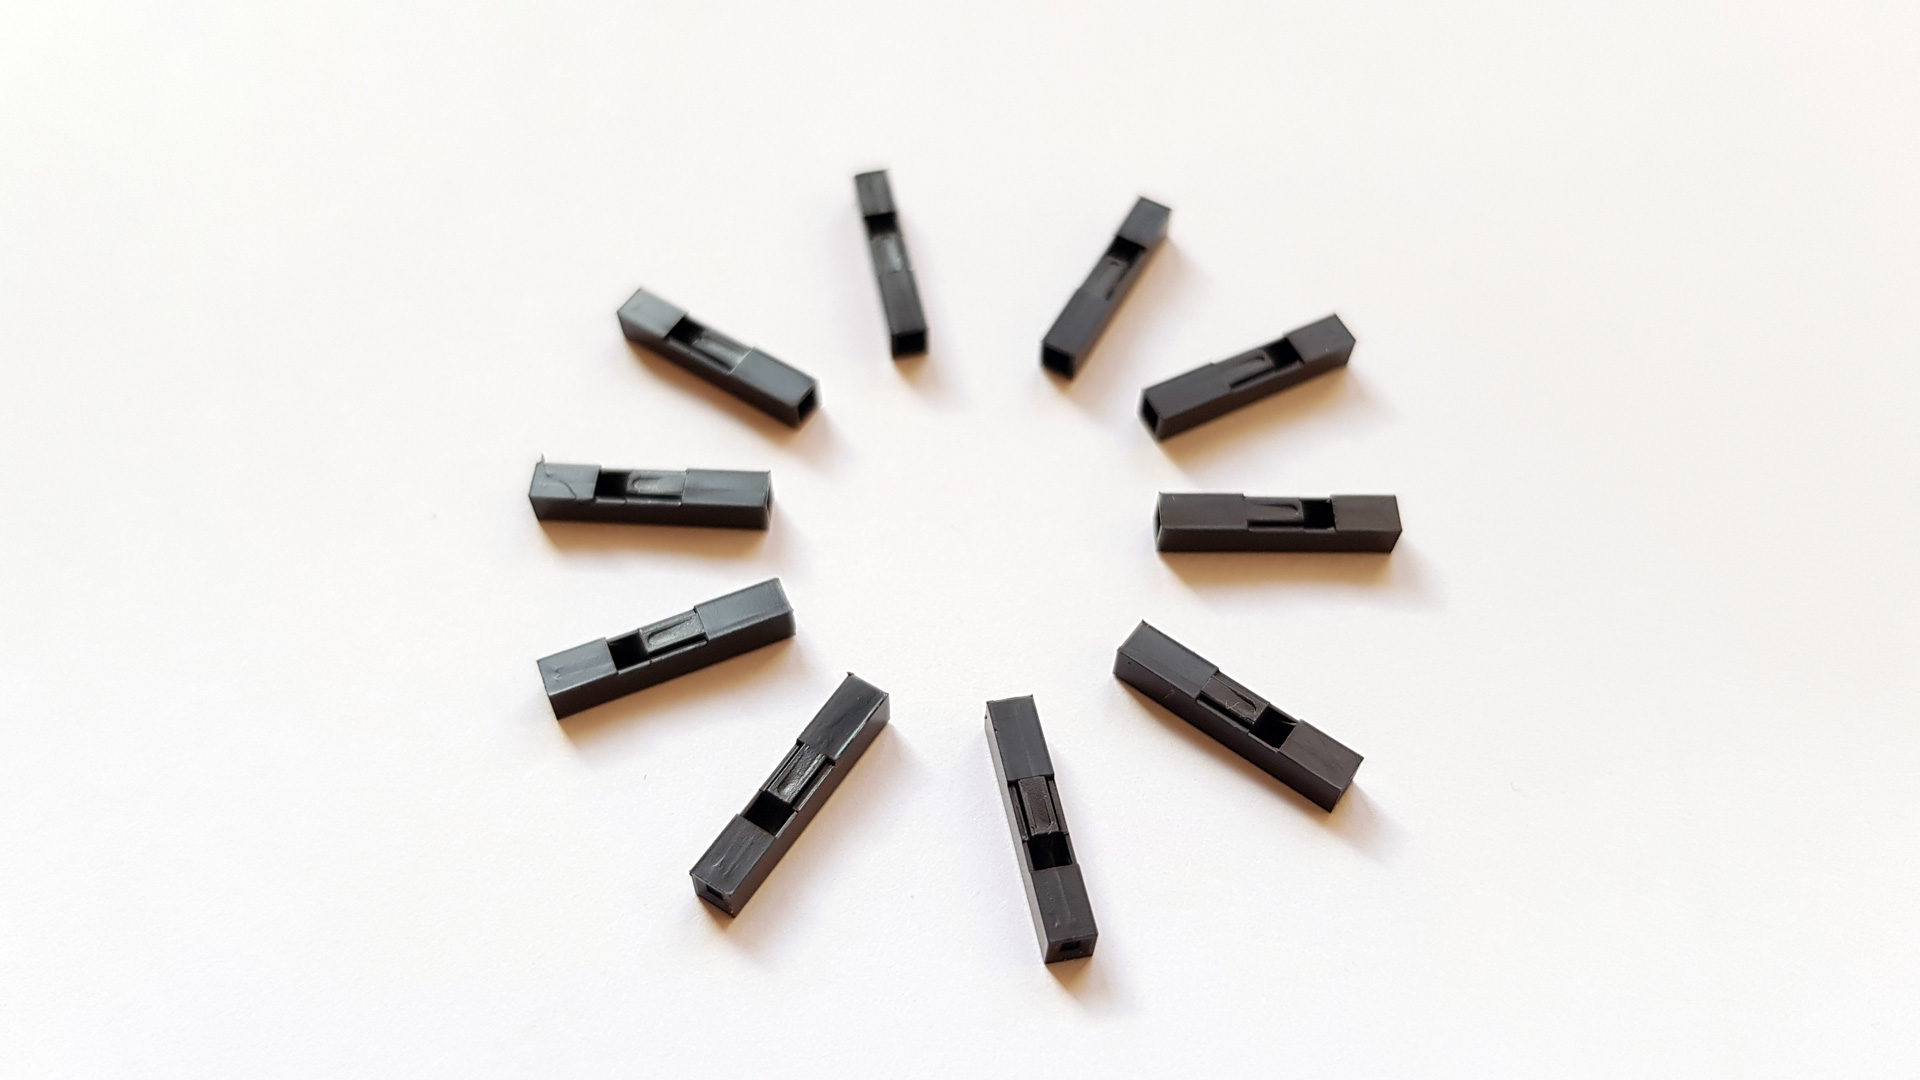
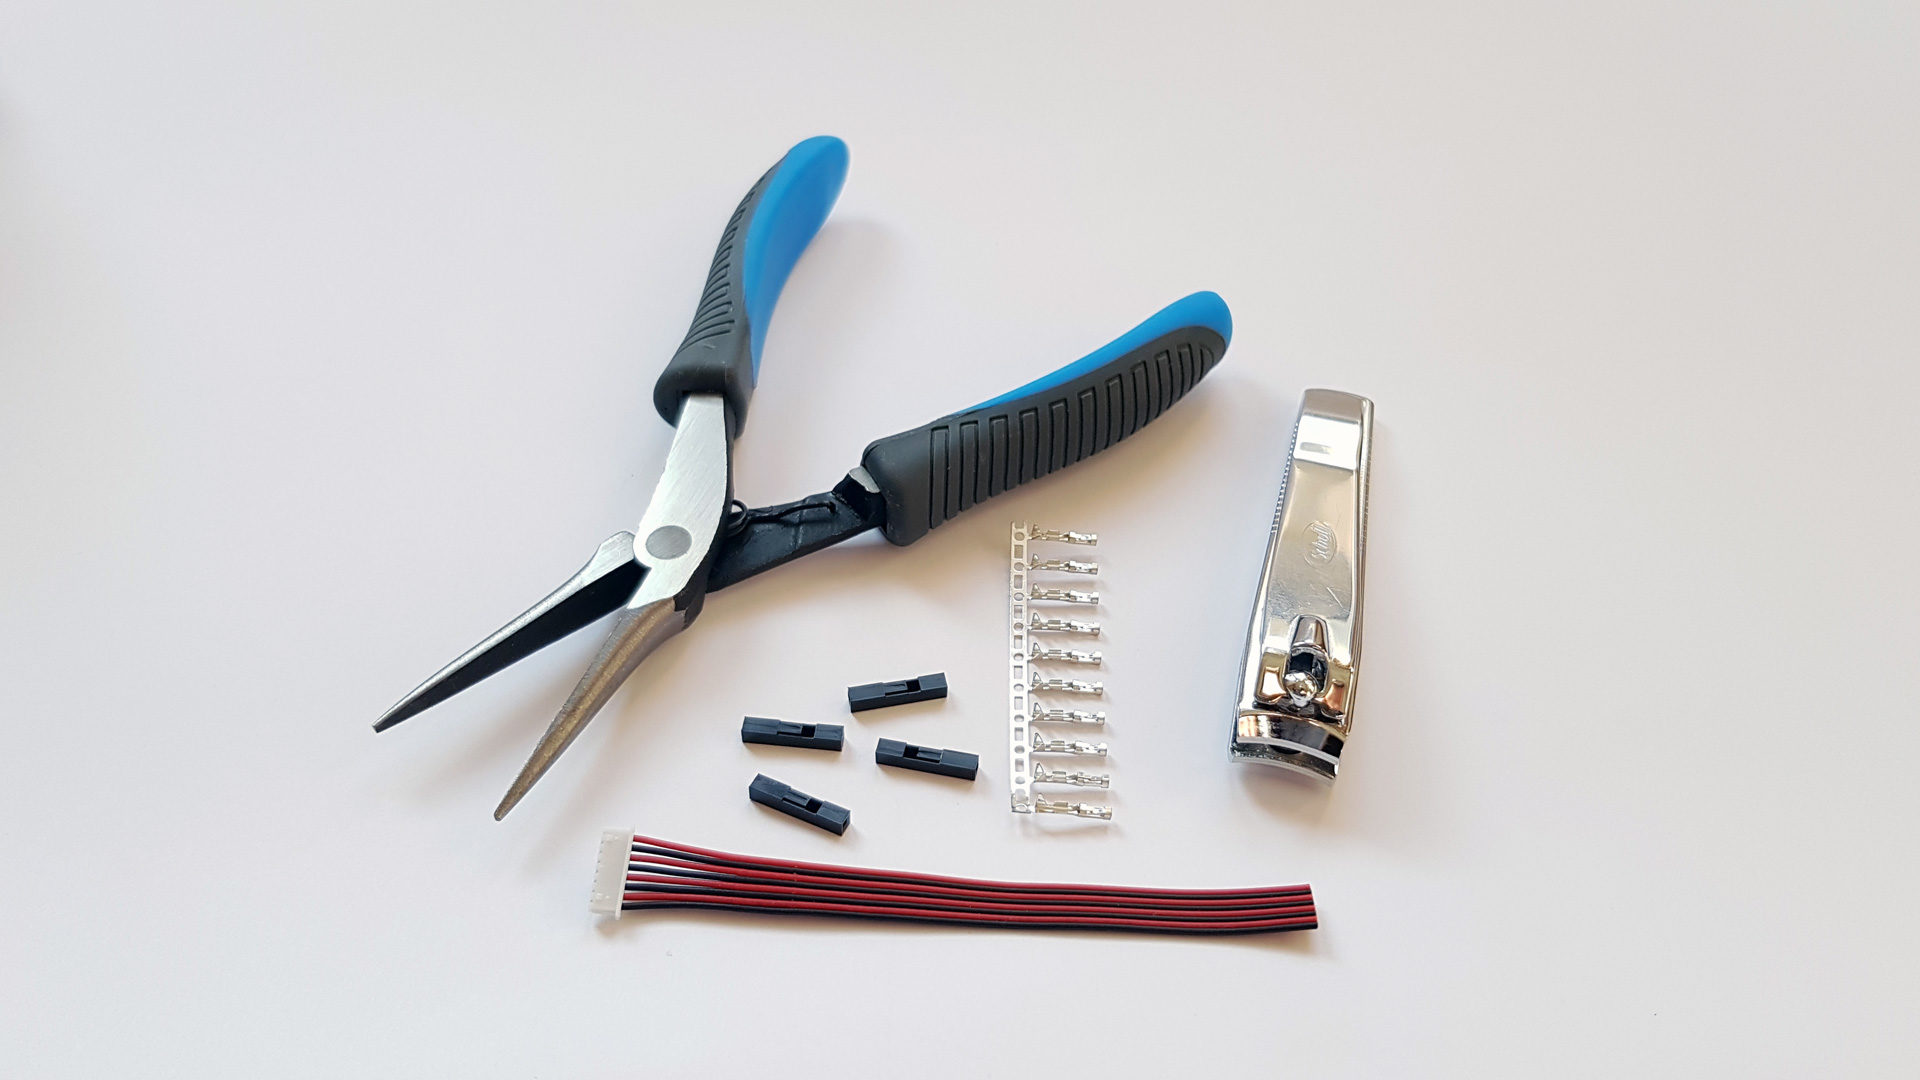
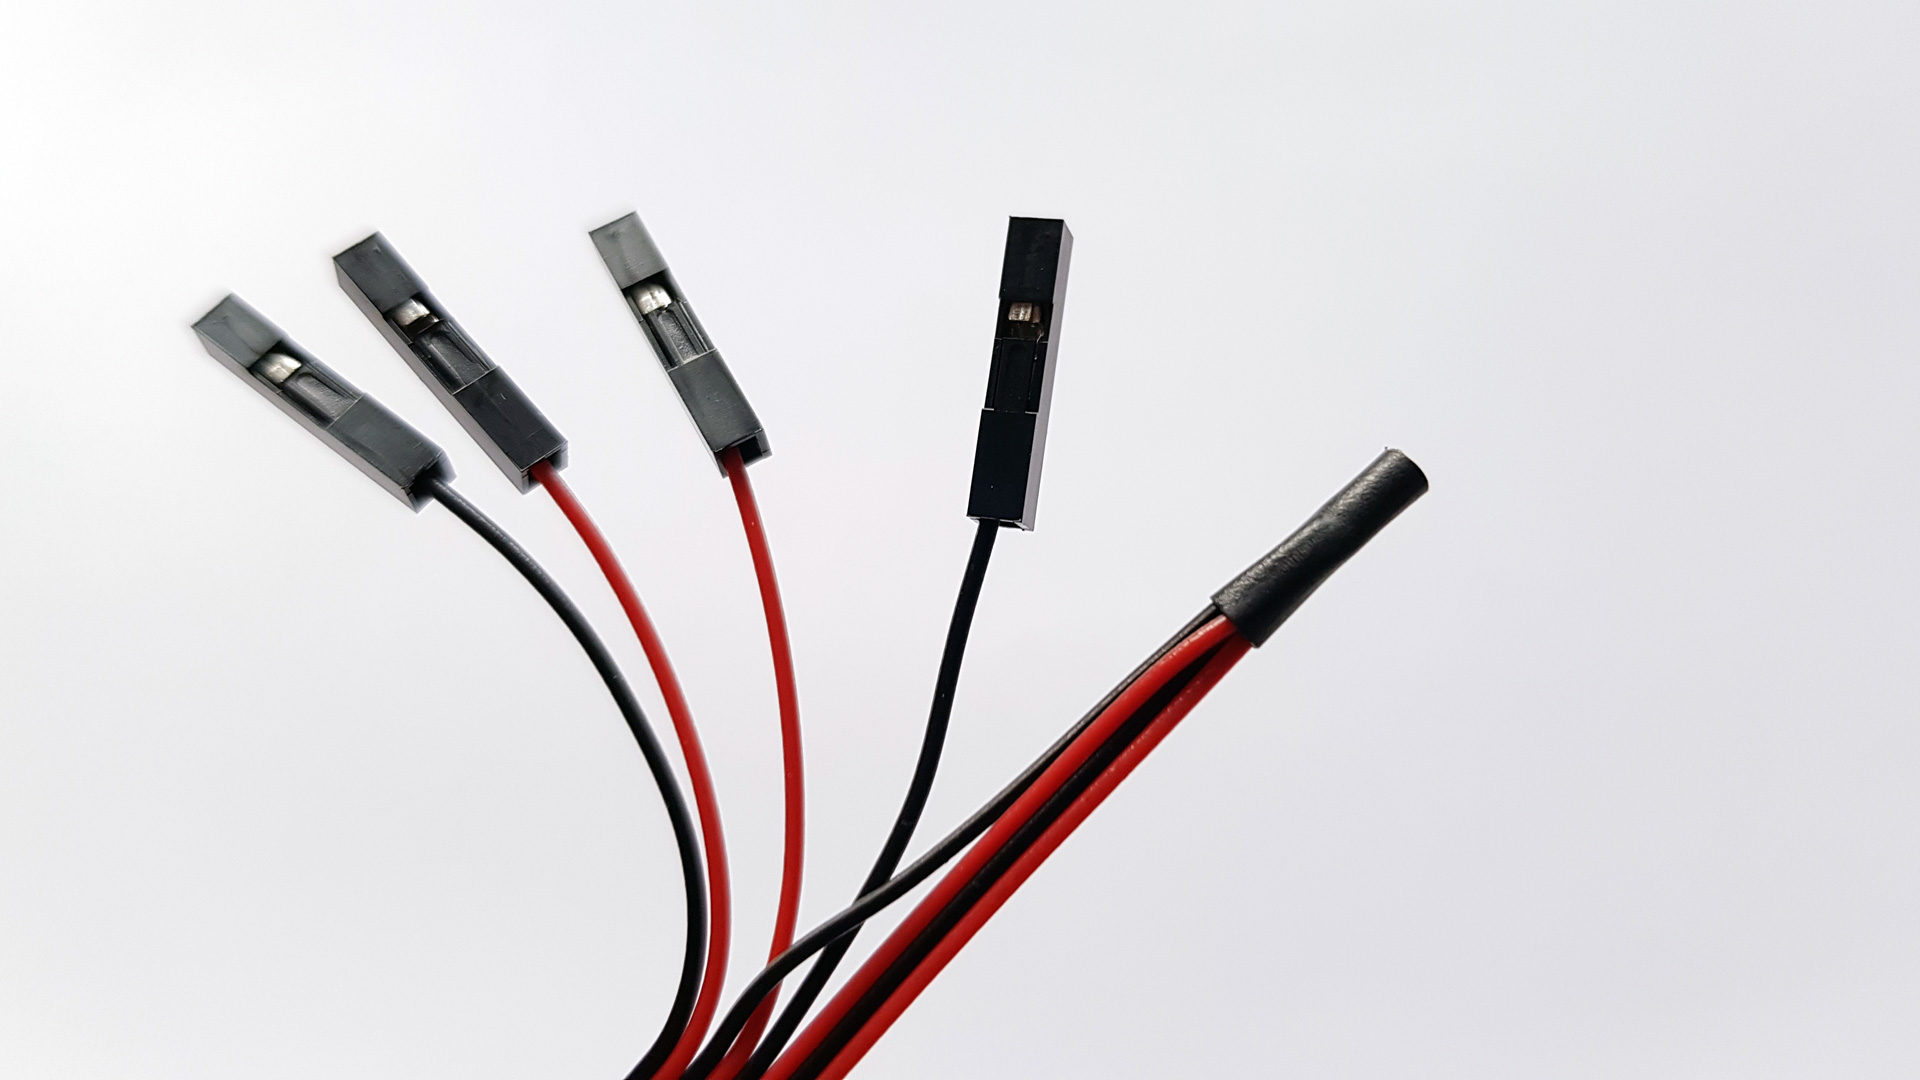
- 4 “dupont” (a.k.a. Mini PV) single pin female housings and terminals with 2.54mm spacing (buy a few more, just in case)
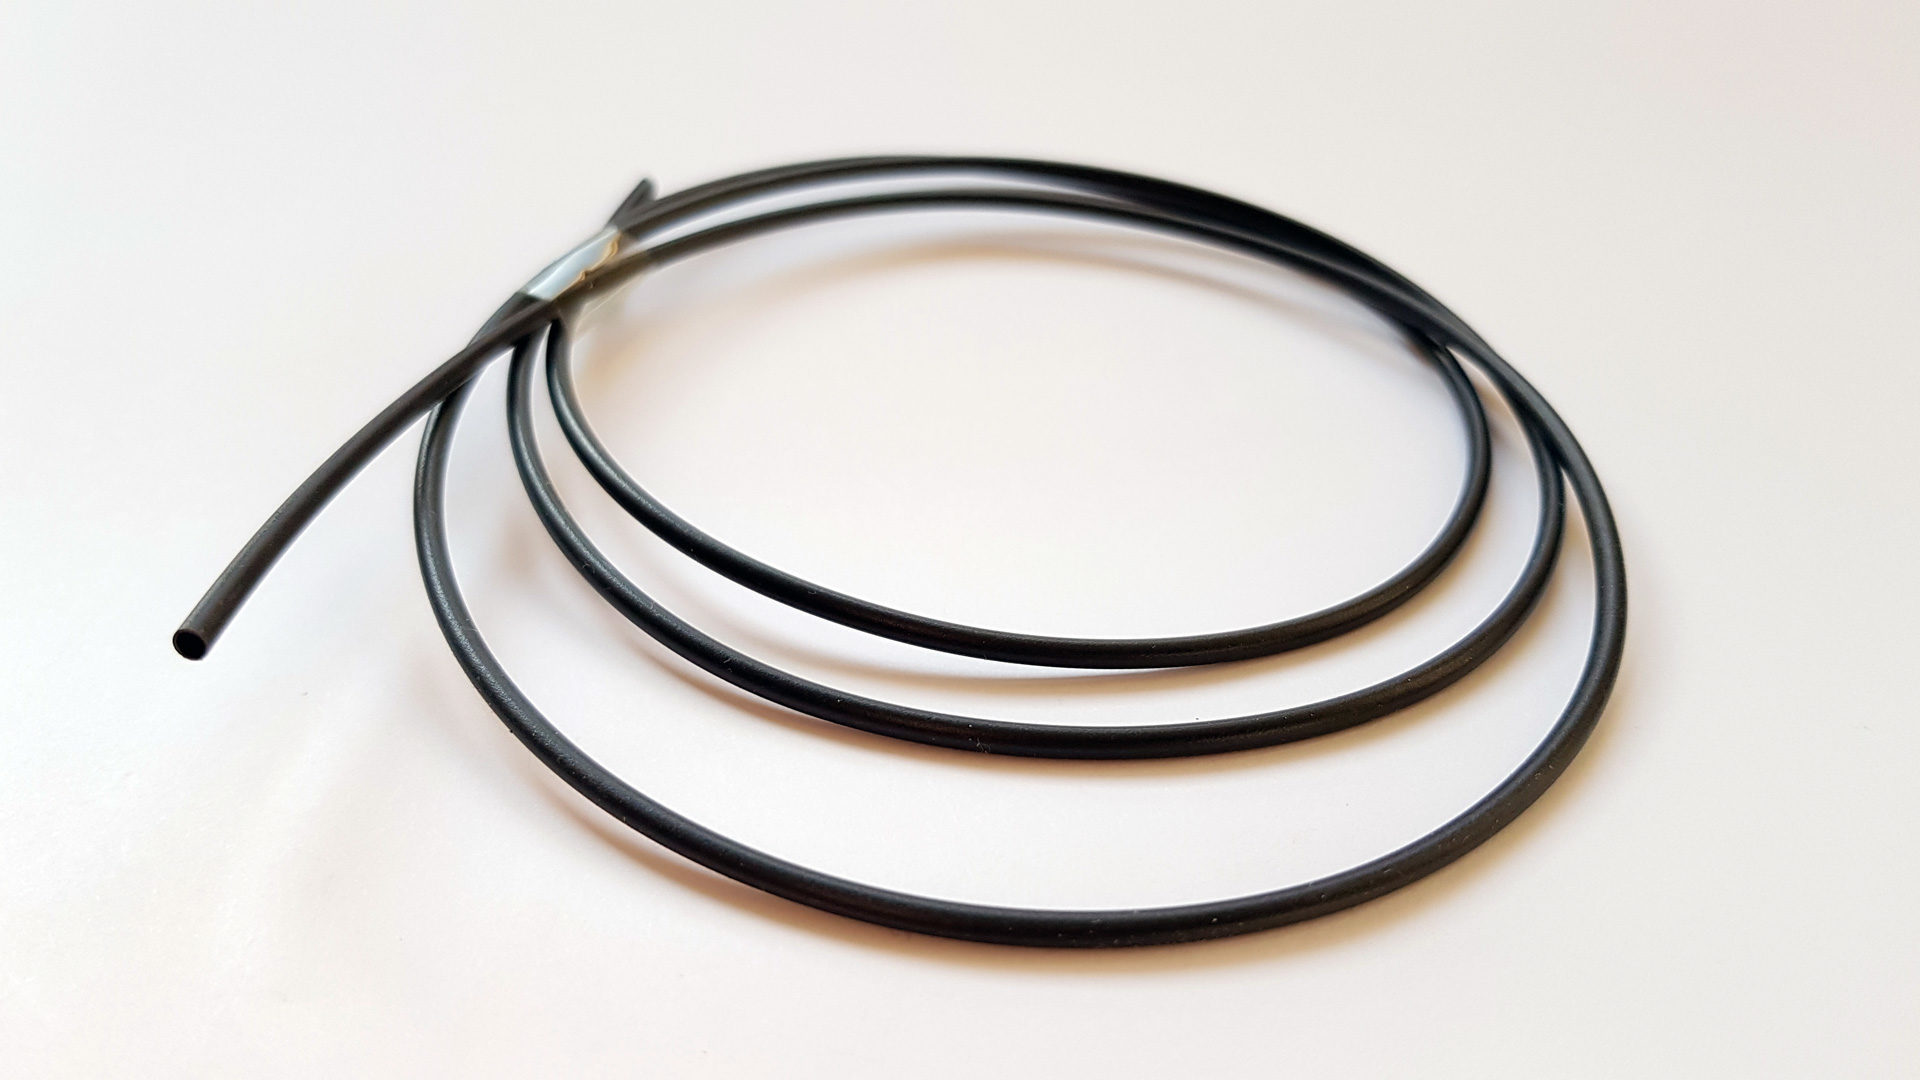
- a short 1.6mm/0.8mm heat-shrink tube or an electrical tape
- a good pair of needle-nose pliers or a dupont crimp tool
- wire cutter pliers or a nail clipper
If you’d rather connect the sensor to the USB port, using the USB to UART adapter I mentioned above, check out the comments section where I explained how to do that.
Connecting PMS7003 to GPIO pins
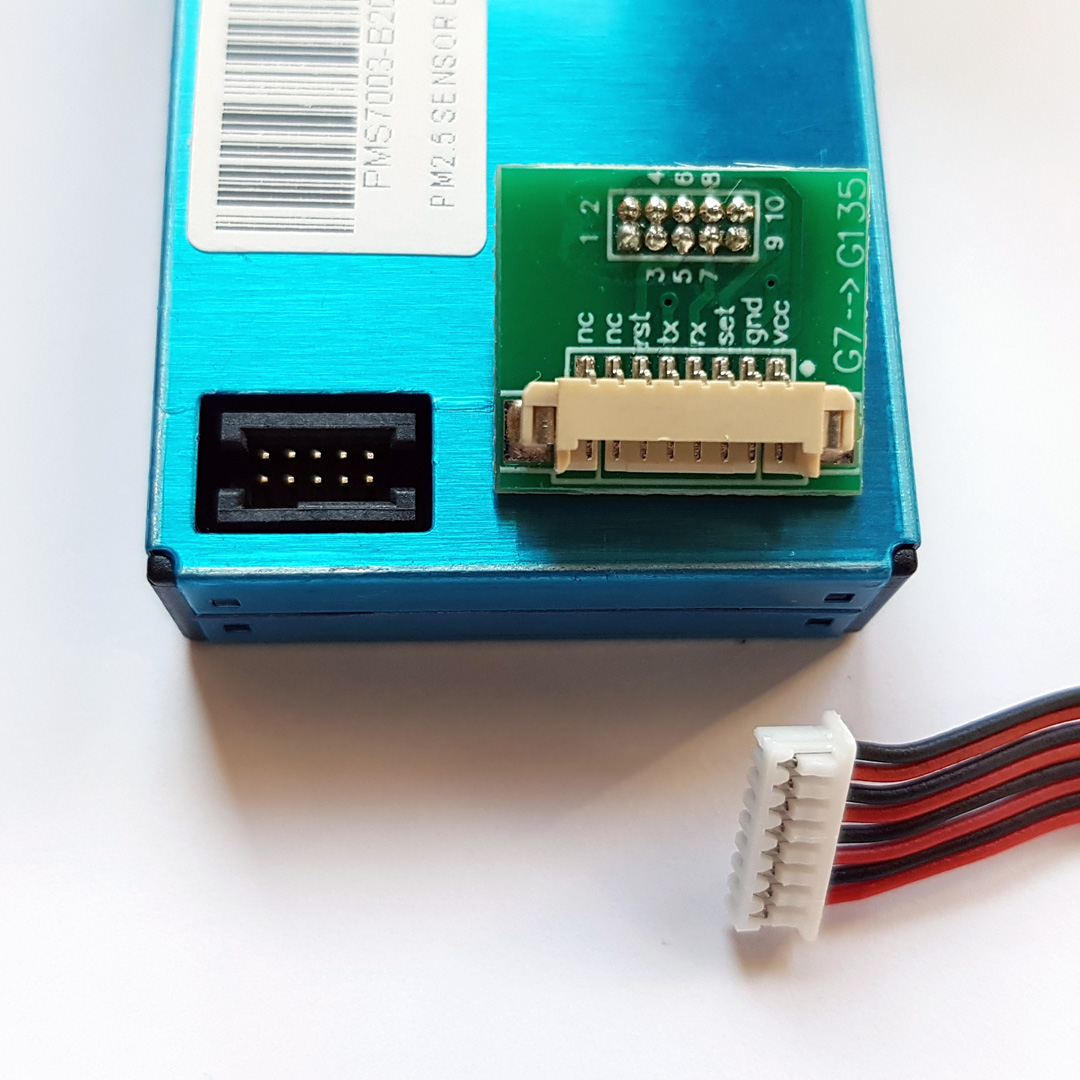
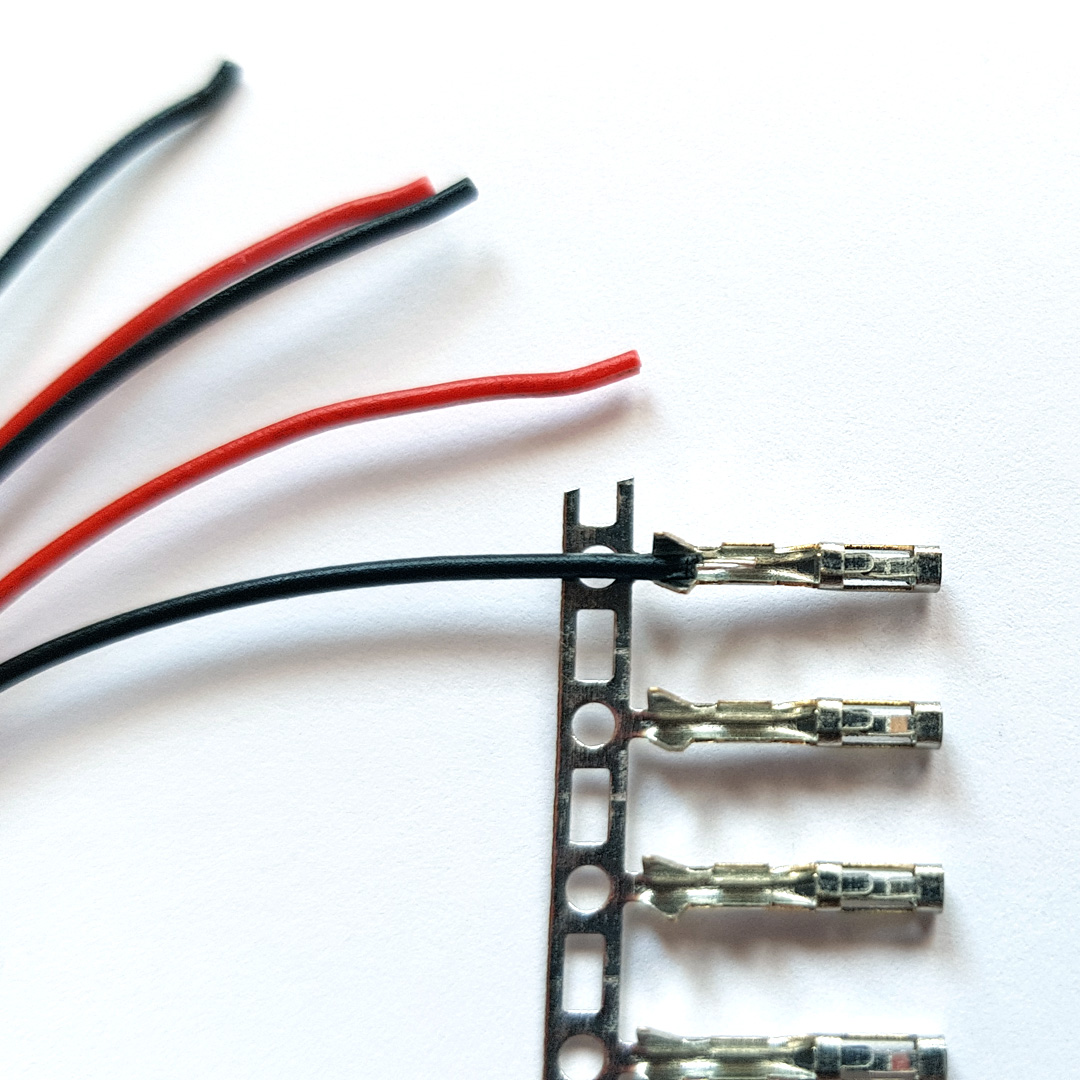
Connect the G7 adapter to PMS7003 pins (enumeration of pins starts from top right to bottom left corner). The cable you get with the G7 adapter has the same connector on both ends – one goes into the adapter, but the other is not useful. We’ll cut off that connector and crimp a dupont connector on four wires – VCC (first wire), GND (second wire), RX (forth wire) and TX (fifth wire). Other wires are not used.
Strip about 4mm of insulation from each of those four wires. Place the wire in the terminal. The positioning of the wire in the terminal is important – the bottom fold-over wings should be over the insulation and the next pair of wings should be over the copper part of the wire. The wire should not extend any further than the second pair of wings.
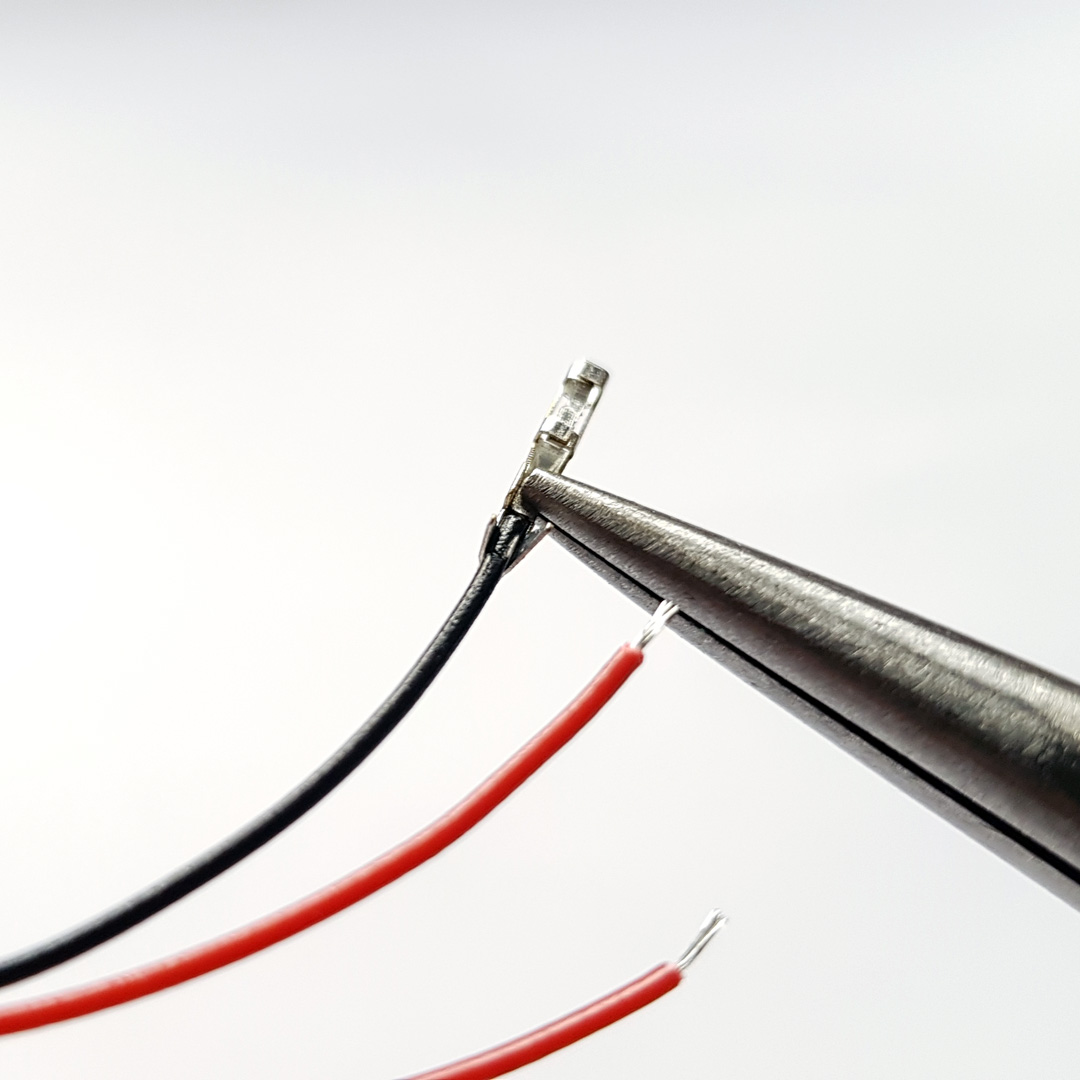
Now use the needle-nose pliers to fold the bottom pair of wings. This keeps the wire in the right position. The next step is either to use the crimp tool or fold the second pair of wings with the pliers. Do this carefully.
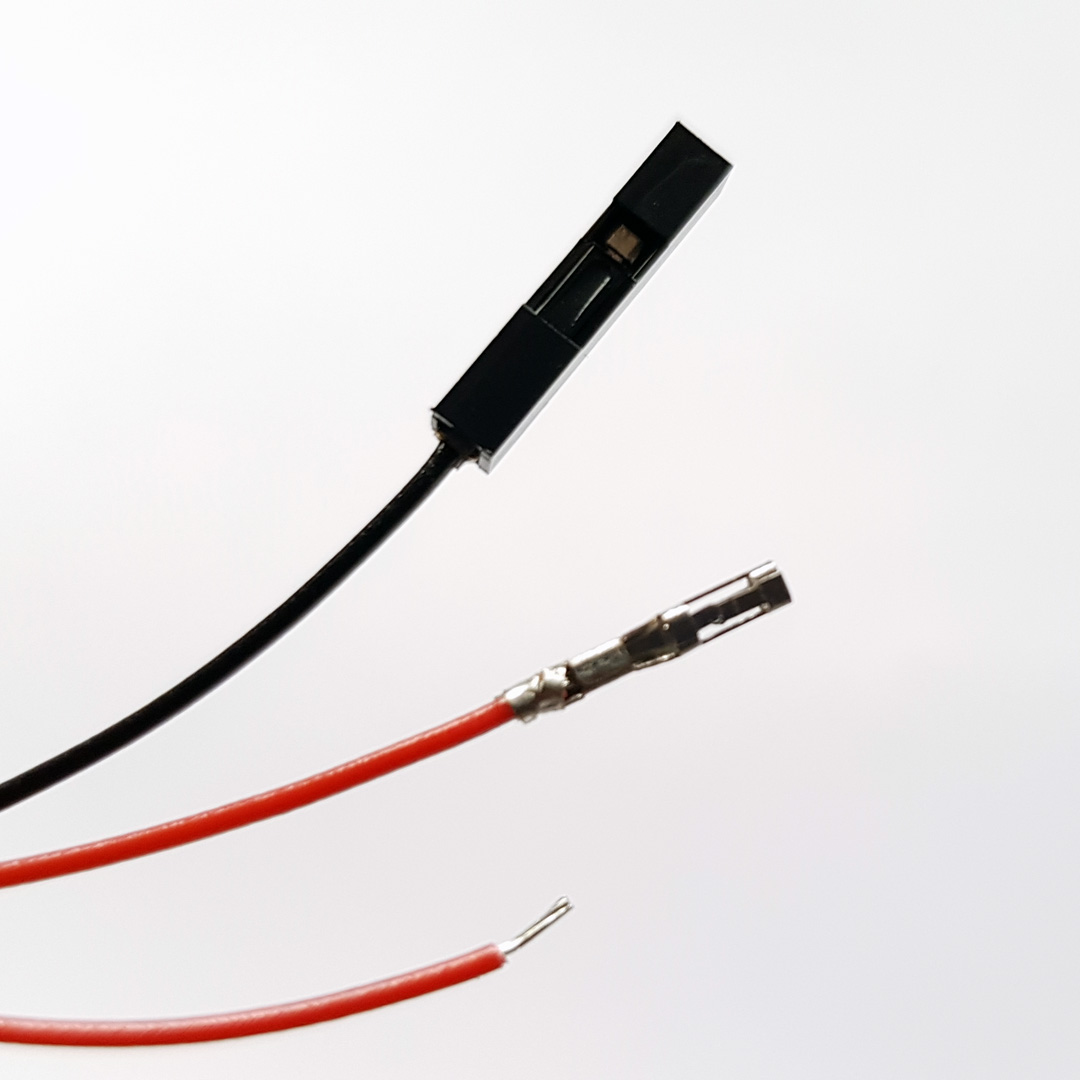
Mount the connector housing on the terminals.
Use a piece of heat-shrink tube or electrical tape to insulate the rest of the wires.
Now connect the dupont connectors to GPIO pins on the Raspberry Pi – VCC to 5V, GND to GND, RX to TX and TX to RX. By default, GPIO 14 and GPIO 15 pins are used for serial communication.
Software
Headless Raspberry Pi
For this project, you don’t need a monitor or a keyboard connected to your Raspberry Pi. Just enable remote access and let it run. If you are starting from scratch, I have written a separate article on how to set up a headless Raspberry Pi.
Install Java
You’ll need Java for the code below. I have written an article on how to install Java 11 on a Raspberry Pi.
Enable serial interface
If you are using Raspbian, by default, the serial port is assigned to the Linux console. We need to change this setting so we can communicate with the sensor.
sudo raspi-configIn Interfacing Options > Serial section, disable the serial login shell and enable the serial interface.
Reboot the Raspberry Pi for the change to take effect.
sudo rebootJava and serial communication
There aren’t many options for serial port access from Java. The first library I tried was jSerialComm, but I couldn’t make it work. The final choice was Pi4J library which alongside other features, provides support for using the serial port. It has some bugs in that part, but it works.
Pi4J depends on the WiringPi native library, so you need to install it first.
sudo apt-get install wiringpiUse the following command to check if it works properly:
gpio -vIf you are using Maven or Gradle, include the following dependency for the Pi4J library in your project:
<dependency>
  <groupId>com.pi4j</groupId>
  <artifactId>pi4j-core</artifactId>
  <version>1.2</version>
</dependency>
PMS7003 protocol
You can find the protocol specification for the PMS7003 in the English manual.
PMS7003 has two modes of work. In active mode, which is the default after powered on, it constantly sends data with the latest measurement (in intervals of 200~2000ms). In passive mode, you need to send the command to initiate the measurement process.
Activate passive mode:
- request: 42 4D E1 00 00 01 70
- response: 42 4D 00 04 E1 00 01 74

Activate active mode:
- request: 42 4D E1 00 01 01 71
- response: 42 4D 00 04 E1 01 01 75

Initiate measurement in passive mode:
- request: 42 4D E2 00 00 01 71
- response: one data telegram

Send to sleep:
- request: 42 4D E4 00 00 01 73
- response: 42 4D 00 04 E4 00 01 77

Wake-up:
- request: 42 4D E4 00 01 01 74
- response: none
Java code
The idea is to make a task which will be called every 5 minutes and does the following:
- Wake-up the sensor
- Let it run for 1 minute and collect the measurements in that period (it is recommended to let the fan run for at least 30 seconds to get stable data)
- Switch the sensor to sleep mode
- Use the latest collected measurement
Why not use the passive mode? From my experience, the sensor often does not respond to passive mode commands.
First, we need a class to represent a single measurement:
@Data
public class PMS7003Measurement {

	private Instant time;

	private int pm1_0_cf1;
	private int pm2_5_cf1;
	private int pm10_0_cf1;
	private int pm1_0_atmo;
	private int pm2_5_atmo;
	private int pm10_0_atmo;
	private int pm0_3_count;
	private int pm0_5_count;
	private int pm1_0_count;
	private int pm2_5_count;
	private int pm5_0_count;
	private int pm10_0_count;

}
I’m using Lombok library for @Data and @Slf4j annotations.
PMS7003 gives values of “CF1” (standard particles or CF-1) and “atmo” (atmospheric environment) for supported particle sizes and also the counts. We are interested in “atmo” values.
And now the main deal. You may need to change the serial port address (by default /dev/serial0 is a symlink for a primary serial port on a Raspberry Pi).
@Slf4j
public class PMS7003Driver {

	private static final int FRAME_SIZE = 32;
	private static final byte START_BYTE_1 = 0x42;
	private static final byte START_BYTE_2 = 0x4D;
	private static final byte[] SLEEP_CMD_BYTES = { START_BYTE_1, START_BYTE_2, (byte) 0xE4, (byte) 0x00, (byte) 0x00, (byte) 0x01, (byte) 0x73 };
	private static final byte[] WAKEUP_CMD_BYTES = { START_BYTE_1, START_BYTE_2, (byte) 0xE4, (byte) 0x00, (byte) 0x01, (byte) 0x01, (byte) 0x74 };

	private Serial serial;
	private SerialDataEventListener listener;
	private ConcurrentLinkedDeque<byte[]> measurementBytesQueue;

	public boolean connect() {
		if (isConnected())
			return true;

		measurementBytesQueue = new ConcurrentLinkedDeque<>();

		serial = SerialFactory.createInstance();

		serial.setBufferingDataReceived(false);

		SerialConfig config = new SerialConfig();

		config.device("/dev/serial0")
				.baud(Baud._9600)
				.dataBits(DataBits._8)
				.parity(Parity.NONE)
				.stopBits(StopBits._1)
				.flowControl(FlowControl.NONE);

		listener = event -> {
			try {
				if (event.length() > 0) {
					byte[] bytes = event.getBytes();

					if (bytes.length == FRAME_SIZE)
						measurementBytesQueue.add(bytes);
					else
						log.debug("Bytes received: {}", convertToHexString(bytes));
				}
			}
			catch (IOException e) {
				log.error("Failed to read bytes from event. {}", e.getMessage());
			}
		};

		serial.addListener(listener);

		try {
			serial.open(config);

			log.debug("Opened port.");
		}
		catch (IOException e) {
			log.error("Failed to open port. {}", e.getMessage());
		}

		return isConnected();
	}

	public boolean disconnect() {
		if (!isConnected())
			return true;

		try {
			serial.removeListener(listener);

			serial.close();

			SerialFactory.shutdown();

			measurementBytesQueue.clear();

			log.debug("Closed port.");
		}
		catch (IOException e) {
			log.error("Failed to close port. {}", e.getMessage());
		}

		return !isConnected();
	}

	public boolean activate() {
		if (!connect()) {
			log.error("Can't activate, port not open.");
			return false;
		}

		if (!write(WAKEUP_CMD_BYTES)) {
			log.error("Failed to wake up.");
			return false;
		}

		log.debug("Activated.");

		return true;
	}

	public boolean deactivate() {
		if (!connect()) {
			log.error("Can't deactivate, port not open.");
			return false;
		}

		if (!write(SLEEP_CMD_BYTES)) {
			log.error("Failed to send to sleep.");
			return false;
		}

		log.debug("Deactivated.");

		measurementBytesQueue.clear();

		return true;
	}

	public PMS7003Measurement measure() {
		if (!connect()) {
			log.error("Can't measure, port not open.");
			return null;
		}

		log.debug("Measuring.");

		if (measurementBytesQueue.isEmpty()) {
			log.warn("No measurements available.");
			return null;
		}

		byte[] bytes = measurementBytesQueue.pollLast();

		PMS7003Measurement measurement = new PMS7003Measurement();

		measurement.setTime(Instant.now());

		measurement.setPm1_0_cf1(convertBytesToValue(bytes, 4));
		measurement.setPm2_5_cf1(convertBytesToValue(bytes, 6));
		measurement.setPm10_0_cf1(convertBytesToValue(bytes, 8));

		measurement.setPm1_0_atmo(convertBytesToValue(bytes, 10));
		measurement.setPm2_5_atmo(convertBytesToValue(bytes, 12));
		measurement.setPm10_0_atmo(convertBytesToValue(bytes, 14));

		measurement.setPm0_3_count(convertBytesToValue(bytes, 16));
		measurement.setPm0_5_count(convertBytesToValue(bytes, 18));
		measurement.setPm1_0_count(convertBytesToValue(bytes, 20));
		measurement.setPm2_5_count(convertBytesToValue(bytes, 22));
		measurement.setPm5_0_count(convertBytesToValue(bytes, 24));
		measurement.setPm10_0_count(convertBytesToValue(bytes, 26));

		return measurement;
	}

	public boolean isConnected() {
		return (serial != null && serial.isOpen());
	}

	private int convertBytesToValue(byte[] bytes, int index) {
		return (Byte.toUnsignedInt(bytes[index]) << 8) + Byte.toUnsignedInt(bytes[index + 1]);
	}

	private boolean write(byte[] bytes) {
		try {
			serial.write(bytes);

			return true;
		}
		catch (IOException e) {
			log.error("Failed to write bytes. {}", e.getMessage());
		}

		return false;
	}

	private String convertToHexString(byte[] bytes) {
		StringBuilder builder = new StringBuilder(bytes.length * 2);

		for (byte b : bytes)
			builder.append(String.format("%02x", b));

		return builder.toString();
	}

}
The following class represents a task that will be called periodically:
@Slf4j
public class PMS7003MeasureTask implements Runnable {

	private PMS7003Driver driver;
	private ScheduledExecutorService scheduler;

	public PMS7003MeasureTask(PMS7003Driver driver, ScheduledExecutorService scheduler) {
		this.driver = driver;
		this.scheduler = scheduler;
	}

	@Override
	public void run() {
		log.debug("Running.");

		if (driver.activate()) {
			ScheduledFuture<PMS7003Measurement> future = scheduler.schedule(
					() -> driver.measure(),
					Duration.ofMinutes(1L).toMillis(),
					TimeUnit.MILLISECONDS);

			PMS7003Measurement measurement = null;

			try {
				measurement = future.get(Duration.ofMinutes(1L).toMillis(), TimeUnit.MILLISECONDS);
			}
			catch (InterruptedException e) {
				log.error("Measurement interrupted. {}", e.getMessage());
				future.cancel(true);
			}
			catch (TimeoutException e) {
				log.error("Measurement timed out. {}", e.getMessage());
				future.cancel(true);
			}
			catch (ExecutionException e) {
				log.error("Measurement failed. {}", e.getMessage());
			}
			finally {
				driver.deactivate();
			}

			if (measurement != null) {
				log.debug("PM1.0: {} | PM2.5: {} | PM10.0: {}",
						measurement.getPm1_0_atmo(),
						measurement.getPm2_5_atmo(),
						measurement.getPm10_0_atmo());

				// TODO save into database
			}
		}
		else
			log.error("Failed to activate.");
	}
}
And the final part is to schedule the measurements:
@Slf4j
public class PMS7003Manager {

	public static void main(String[] args) {
		PMS7003Driver driver = new PMS7003Driver();

		PMS7003MeasureTask task = new PMS7003MeasureTask(
				driver,
				Executors.newSingleThreadScheduledExecutor());

		ScheduledFuture<?> future = Executors.newSingleThreadScheduledExecutor().scheduleAtFixedRate(
				task, 0L, Duration.ofMinutes(5L).toMillis(), TimeUnit.MILLISECONDS);

		Runtime.getRuntime().addShutdownHook(new Thread(() -> {
			if (future != null && !future.isDone())
				future.cancel(true);

			driver.disconnect();
		}));
	}

}
Compile, run and you should see the concentration values for PM1.0, PM2.5, and PM10. The unit is μg/m³.
Next steps and ideas

- Use InfluxDB to store the measurements (and then create charts for day or month intervals)
- Compare your data with official measurements for your town
- Find out how to calculate pollution levels and the air quality index. If you are living in Europe, check out the European Air Quality Index website.
- Integrate some additional sensors (temperature, humidity, pressure, VOC, CO, NO2, etc)
- Make a case for your Raspberry Pi and the sensor
Please share your thoughts about air pollution in the comments section below. Let me know if this guide helped you build something or inspired you to learn more about the topic.
9 comments
It will be helpful if you explain how to use USB to UART adapter as well
If you want to use the USB to UART adapter I mentioned above, the idea is to connect the wires from that cable to the wires of the cable you get with the G7 adapter.
First, you cut off the connector on one side of the G7 adapter cable and strip about 4mm of insulation. Then take off the housings of dupont connectors on the USB-UART cable. Then join the matching wires by placing the wires inside the dupont housings – use needle-nose pliers to squeeze the housing so the wires stay in place. Use a piece of heat-shrink tube or electrical tape to insulate the wires.
On the USB-UART cable, these are the functions by the color:
red - VCC (5V)

black - GND

green - TX

white - RX
Join the wires is the following way:
G7 adapter cable | USB-UART adapter cable

VCC - VCC

GND - GND

RX - TX

TX - RX
Now you can connect the G7 cable to the G7 adapter and the PMS7003. And the USB side to your PC or the Raspberry Pi.
The software part of things is the same as using the serial connection over the GPIO pins.
And since photos are better than words: https://joshefin.xyz/wp-content/uploads/2019/08/usb-uart-g7.jpg
I have a PMS5003 sensor. The command strings look identical, so I guess the 7003 is a newer version.
The PMS 5003 that I have starts returning nonsense values after some time in active mode. So I *only* use it in passive mode.
Code to readit from a PC using an FT232H can be found on github: https://github.com/rsmith-nl/ft232-pms5003
Thanks for sharing your solution.
PMS7003 is smaller. But the protocol is the same.
Interestingly, I have the opposite experience. I wanted to use the passive mode, but for some reason, and I’m not sure if it’s up to the library for serial communication, limitations of the mini UART on the RPi or the PMS7003 – it just does not respond to commands to switch modes.
It’s working stable for many days in the way I described in the article – wake it up, let it run for some time in active mode, read the latest frame, send to sleep.
Hi, Zeljko,
I did something similar to you (SD011 sensor, though), but I also hooked it to read national air-quality at the same time and it sends me message on Telegram if diff is high:) I am pinging you mostly because I think our national air-quality agency is the same agency:) (http://amskv.sepa.gov.rs). Anyway, shoot me mail if you wa t, maybe we can craft something together:)
P.S. Do not trust everything on Twitter, out air quality is not that bad:/
hello friends.
in my case, i had to add more code for log. and also modify the timeout.
the timeout on creating ScheduledFuture have to smaller than the timeout on future.get function
and you also need more dependencies.
now the code is working.
i can not speak eng well but i wish this tiny comment will be helpful to another friends
Thaaaaaaaaaaaank you!!!!!
well, thank you, this worked.
the hardest part was to solder the small G7 adapter to some wires because i forgot to order the G7->G135 adapter along with the pms7003.
i had to change a bit the measurement input collect to wait for a bit more over 1 minute (the active running time) because the measurement data is simply not fed to the serial interface immediately after the 1 minute run time. I just used 80 seconds, could probably be reduced to runtime+small_margin of few seconds.
besides that, it would be nice if you’d put the entire java project in github or something similar so it’d be simpler to get this working.
This was super helpful, and you helped inspire this: https://github.com/c6rbon/AQI-PMS7003
I was looking for PMS7003 resources, and found your docs!